Notes / Context Engineering
How to install Claude Code
Step-by-step installation, how to log in, how to connect cheaper models and the basics of using it.
· 4 min read
Introduction
Today, a simple guide so that I can calmly move on to further topics and not worry that I'm going too fast. So without further ado.
What is Claude Code
Claude Code is an app that helps you write code from the terminal (cmd), although it's most convenient to use it together with an IDE such as VS Code or Cursor.
Claude Code requirements
The requirements aren't demanding. It runs on newer operating systems and requires 4GB+ of RAM. If we want to install it through NPM, Node.js 18+ will also be required.
How to install Claude Code
We have two installation options.
Native
For each system, we run the corresponding command in the terminal.
Windows CMD:
curl -fsSL https://claude.ai/install.cmd -o install.cmd && install.cmd && del install.cmd
macOS, Linux, WSL:
curl -fsSL https://claude.ai/install.sh | bash
When installing on Windows, I got a message in the terminal that I had to add the variable to the path myself
Setup notes: Native installation exists but C:\Users\elfil\.local\bin is not in your PATH. Add it by opening: System Properties → Environment Variables → Edit User PATH → New → Add the path above. Then restart your terminal.
In this case, claude won't be available to us until we do this.
- Copy the path that Claude returned to you in the terminal
- Open the system search
- Search for “Environment Variables” or “Edit the system environment variables”
- In the window that opens, choose the “Environment Variables” button
- In the system variables, find the Path variable, click on it and choose edit
- Add a new line and paste the copied path there.
- Confirm with the OK buttons
Installing through NPM
In this case we use the command
npm install -g @anthropic-ai/claude-code
After installation, the claude command will become available. If you see an error when running it, close and reopen the terminal. The next step will be logging in to Claude Code with an Anthropic account.
Create a folder where we'll make a new project and go to it in the terminal with the command
cd /path/to/your/project
On Windows 11 you can right-click the folder and choose open in terminal or copy as path and paste it after the cd command
Once we have the right folder selected, we can finally run the claude command.
After launching it, we'll first see a color choice, and the second step will be logging in.
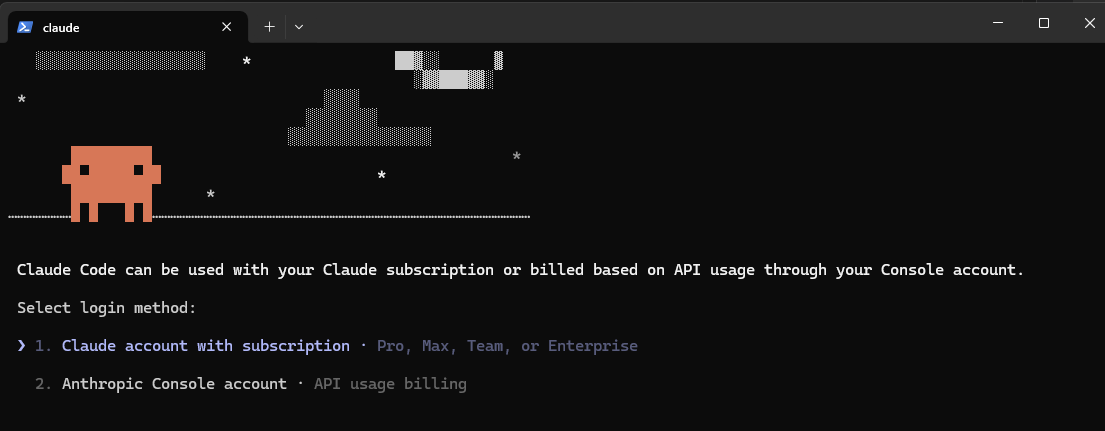
We'll see two ways to log in:
- With a Claude account with a subscription - we need to have one of the paid plans active, otherwise it won't let us log in.
- With a console account - you pay for what you use through the API, you don't need to have anything paid in
I don't currently have a plan, so I choose to log in with a Claude console account. You can create an account on this page. After choosing it and logging in, an API key will be automatically created and assigned to your account. A /buy-credits page will appear, but you can simply close it and you'll be logged in anyway.
It's worth mentioning here that we can connect cheaper models to Claude Code, which have similar power to Anthropic's models but cost $6 instead of $20. You can find example implementations here:
Recently, an interesting project called Claude Code Router was also created, which connects our app to Open Router and lets us use all the models available there - including the free ones. You can find the project here.
I'll probably also prepare a guide on how to do it myself at some point in the indefinite future.
How to use Claude Code - the basics
As we already know, Claude Code is used from the terminal. You can see all the commands:
- by typing “/” and using the suggestions
- by using the “/help” command
Initialization
The first command when we start working on a new project is the /init command. After using it, CC checks the whole folder and what's in it, and creates a claude.md file, which is a table of contents of our project and everything related to it. Thanks to this, both we and CC have information about what the project is about in one place, and it doesn't have to check all the files from scratch every time.
Making changes
When we want to make some changes and run a prompt, we simply type it into the terminal without any “/” slashes before it. Here we also have a few options available through shortcuts:
- TAB - toggles whether we want to use a thinking model (better models, but more expensive)
- Shift + TAB - switches between plan mode and normal mode. Plan mode means that instead of making changes right away, we're first shown a description of what will be changed and what the plan of action is. After that we can accept the plan and it will start working, change it, or reject it and start over.
Undoing changes
Personally, I use Claude Code through an IDE where I have GIT connected. This way I can conveniently see which files were changed and where, and I can control whether I want to keep some of the changes, all of them, or maybe undo everything. If that's not a solution for you, CC has a built-in /rewind command
How to update Claude Code
Claude updates itself every now and then, but it's worth checking the version from time to time with the /version command and comparing it with what's on the changelog page.
If you've read to the end, feel free to follow me on LinkedIn, where I post notifications about new posts and extra news from the world of building with AI.